Laser Cut Standing Rose Svg Files: A Practical Guide to Digital Crafting
In the evolving landscape of digital fabrication, the intersection of design precision and material versatility defines successful projects. Laser Cut Standing Rose Svg Files represent more than just decorative assets; they are functional components in a broader workflow for creators, small business owners, and hobbyists. Whether you are preparing for a wedding, curating a retail display, or developing a personalized gift line, understanding how to integrate these digital files into your production process is essential for efficiency and quality.
This article explores the practical application of free-standing rose designs, focusing on preparation, material compatibility, and the strategic use of customization features. By treating these SVG files as part of a structured creative pipeline, you can ensure consistent results and maximize the value of your laser cutting equipment.
Understanding the Design Architecture
Before initiating any cut, it is crucial to understand the structural logic behind free-standing 3D paper or wood crafts. Unlike flat decals or two-dimensional ornaments, a standing rose requires specific engineering to maintain stability. The designs discussed here feature an innovative interlocking mechanism using two heart-shaped bases. This system provides a secure support structure, allowing the rose to stand independently without external adhesives or hidden supports.
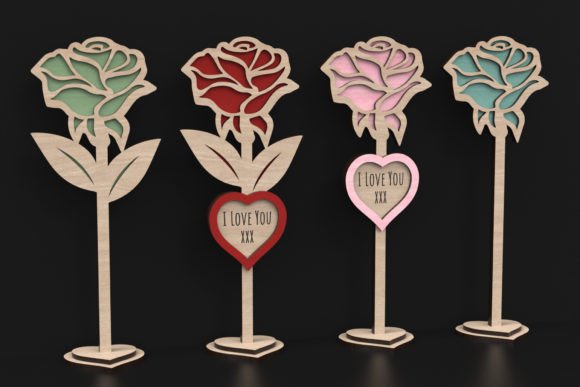
The collection includes four unique patterns, each serving different aesthetic and functional needs:
- The Timeless Rose: Features an upright stalk, offering a classic silhouette suitable for traditional decor.
- The Charismatic Variant: Showcases two leaves, adding volume and a naturalistic touch to the composition.
- The Heart Accent: A custom-designed pattern where the rose head embodies a heart shape, ideal for romantic themes.
- The Deluxe Version: Combines the leaf-touch with the heart shape, providing the most intricate visual profile.
Each design stands at approximately 20cm tall. This dimension is significant for workflow planning, as it dictates the minimum material sheet size required and influences nesting strategies to minimize waste. The designs utilize two or three layers of thickness, balancing structural solidity with aesthetic delicacy.
Integrating SVGs into Your Production Workflow
Implementing Laser Cut Standing Rose Svg Files effectively requires a methodical approach. The process extends beyond simply loading a file into your laser software. It involves preparation, testing, and quality control steps that ensure the final product meets professional standards.
Pre-Production Preparation
Success begins with file verification. Although SVGs are vector-based and scalable, it is advisable to maintain the recommended dimensions for structural integrity. Scaling down significantly may compromise the interlocking tabs, while scaling up could require thicker materials to prevent wobbling. Use your preferred vector editing software to inspect paths for continuity. Ensure that all cut lines are closed shapes and that engraving areas are properly distinguished from cut lines, typically by color-coding layers.
Material selection is another critical decision point. These files are compatible with a wide range of materials, including cardstock, acrylic, plywood, and MDF. However, the choice of material affects both the cutting parameters and the final appearance. For instance, acrylic offers a sleek, modern look but requires precise power settings to avoid melting edges. Wood provides warmth and texture but may require sanding post-cut. Align your material choice with the intended use case—durability for long-term displays versus cost-efficiency for event-specific decor.
Execution and Machine Settings
During the cutting phase, consistency is key. Establish a baseline set of parameters for your specific machine and material combination. Conduct test cuts on scrap pieces to verify that the interlocking bases fit snugly. If the fit is too loose, the rose will not stand securely; if too tight, assembly becomes difficult and risks breaking delicate tabs. Document these settings in a production log to streamline future batches.
For designs featuring engraving capabilities, prioritize the engraving step before cutting. This sequence prevents movement issues that can occur if the piece is partially detached from the material sheet. Two of the exclusive patterns allow for laser engraving, enabling you to inscribe names, dates, or messages. This feature transforms a standard decorative item into a personalized keepsake, adding significant value for clients seeking custom gifts.
Customization and Personalization Strategies
The ability to personalize products is a major advantage in today’s market. The inclusion of engraving-ready zones in these rose designs allows for seamless integration of custom text. When planning a project involving multiple units, such as wedding favors or corporate gifts, organize your workflow to handle variable data efficiently.
Use software that supports batch processing or variable data printing principles. Prepare a spreadsheet containing the unique text for each item, and map this data to the engraving layer in your design file. This approach minimizes manual editing time and reduces the risk of errors. For entrepreneurs, this capability opens up revenue streams through personalized offerings without requiring complex additional tooling.
Consider the visual impact of the engraving. Contrast is essential for readability. On dark woods, lighter engraving depths may be sufficient, while acrylics might require frosting effects achieved through specific speed and power combinations. Test different settings to find the optimal balance between legibility and material integrity.
Post-Processing and Assembly
Once cutting is complete, the assembly process determines the final quality of the product. The interlocking heart-shaped bases are designed for ease of assembly, but careful handling is required. Remove cut pieces gently to avoid snapping thin connections. Clean any residue or char marks from the edges, especially when working with wood or acrylic. A soft brush or compressed air can effectively remove debris without damaging delicate petals.
Assemble the base first, ensuring the two heart shapes interlock firmly. Insert the stalk and attach the rose head, aligning any tabs or slots precisely. For multi-layer designs, apply minimal adhesive if necessary, though the mechanical fit should ideally suffice. Inspect each assembled unit for stability. A well-constructed rose should stand upright on a flat surface without tipping.
Applications and Use Cases
Understanding where these fits into broader projects helps maximize their utility. Here are several practical applications:
- Event Decor: Use the 20cm height for table centerpieces. The uniform size ensures a cohesive look across multiple tables. Combine different patterns to add visual interest while maintaining a consistent theme.
- Retail Displays: Incorporate standing roses into window displays or shelf arrangements. Their free-standing nature allows for flexible placement without visible supports.
- Educational Projects: Utilize the assembly process for STEM activities, teaching students about structural engineering and geometric design.
- Personalized Gifting: Leverage the engraving feature for anniversaries, birthdays, or memorials. The personal touch factor enhances emotional value.
Optimizing for Efficiency and Quality Control
To maintain high standards in repeated production, implement a quality control checklist. Verify that each cut piece matches the digital template dimensions within acceptable tolerances. Check for burn marks or incomplete cuts that may affect assembly. Standardize your packaging process to protect the delicate structures during storage and shipping. Using rigid boxes or protective sleeves can prevent damage to the petals and base.
Organization of digital assets is equally important. Maintain a library of your tested settings for different materials. Label files clearly with version numbers and material specifications. This practice reduces setup time for future projects and ensures consistency across batches.
Conclusion
Laser Cut Standing Rose Svg Files offer a blend of elegance and functionality that suits a variety of creative and commercial workflows. By understanding the design architecture, optimizing machine settings, and leveraging personalization features, you can produce high-quality, free-standing floral decorations efficiently. Whether for events, retail, or personal gifts, these designs provide a reliable foundation for creating memorable experiences. Focus on preparation, precision, and process improvement to integrate these assets seamlessly into your crafting routine.